We built our own patio. Applause. The sin of not having a DIY dad on either my or my partner’s side meant we accrued many mistakes. Even Google couldn’t prepare us. If you’re one of those people who’d like to ask me “what advice do you have?”, here’s my letter to you:
Lesson 1: FOR THE LOVE OF GOD, ASK YOUR TILE SUPPLIER THE WEIGHT OF YOUR TILES
We were advised to stay away from laying porcelain or ceramic tiles (very sound advice indeed), because they’re expensive and are more prone to cracking if you make mistakes elsewhere. So what did we do? We went for the next premium option on the list and opted for Brazilian black slate.
Brazilian black slate. come in many sizes, ranging from 400x400mm to 600x900mm tiles. My partner (Will) and I put our 2 brain cells together and figured: “hey, the bigger the tiles, the less we have to put down!” Also, the aesthetic of jumbo tiles seemed neat to us.
BIG MISTAKE.
One tile weighed somewhere between 30-40kg. I made one attempt to lift a single tile through our house, and only managed to move the gas through my body. Even Will struggled to move one (in the end, he soldiered through and managed 3 consecutive tiles through the house without breaks). This meant that we certainly could not multitask the tile laying activities. Relying entirely on one person to lift the tiles and place it down really slowed down the tile laying process. So you know, we were laying a patio of about 10m^2, which equated to the use of 18 600x900mm tiles.
Lesson 2: Wear gloves when handling mortar
Listen, I know what you’re thinking. But let me tell you, when you’re tired and desperate, and want to get shit done, and you forgot your gloves at the other end of the garden, past an obstacle course of rubble and tools, you’re going to take short cuts. My thought process was something like: “How bad could it be? It’s not like I do this every day!” scoop
Well, you don’t need to. Because the next day, my hands were claw shaped and I couldn’t close them properly. This was due to a combination of lifting heavy tiles and handling mortar bare handed. Even though I washed my hands about 10-20 mins every time I handled bare mortar, I handled it too frequently (too much to count). My hands started to develop cracks and my skin started to peel in odd places. I figured this was a reaction to the mortar. Maybe if I handled the mortar only once or twice I would have been fine, but please just wear gloves anyway. If you’re tired and desparate now, you’ll be more tired and desparate without the use of your dominant hand.
Lesson 3: Use a cement mixer
We bought premade Slablayer Plus mortar, thinking it would be less work. The packaging says it’s suitable to mix with and without a cement mixer. We took this as a sign that it should be easy to manually mix it ourselves. Although we could have hired a cement mixer, it certainly wouldn’t fit in our car and we’d have to have it delivered. This would delay the start of our patio project and we were keen to have a usable patio ASAP, so we skipped the hire option.
Without a cement mixer, one person was on mixing duty at all times. It’s hard work. Your shoulders are in for a ride. But worst of all, we were already 1 person short in a 2 person project since Will was the tile lifter, which took a lot of energy. When other things aren’t going right in the project, believe me, not having a cement mixer is the easiest problem to solve. Just get one. It won’t be as expensive and it’s worth delaying starting your poject for it, unless you’re literally laying less than 1 m^2 of patio.
Don’t get me wrong, I think the consistency of the mortar was just as good (honestly, if not better) when we mixed by hand (without gloves - kidding, I mean with a shovel) than by cement mixer, but I’d rather have a little subpar consistency (barely noticeable) and a little mortar stick to the walls of the mixer than spend 5 mins each time we need to mix new mortar. For a 10m^2 patio, that meant mixing mortar about 13 times (varies depending on what kind of mortar you bought). If we account for faffing around trying to get mortar mix from one end of the garden to the other, that’s easily over 1 hr spent mixing mortar alone! With a cement mixer, that time is negligible (probably down to a few mins just moving bags around).
Lesson 4: Double check the maths on building material products
Look at this photo:
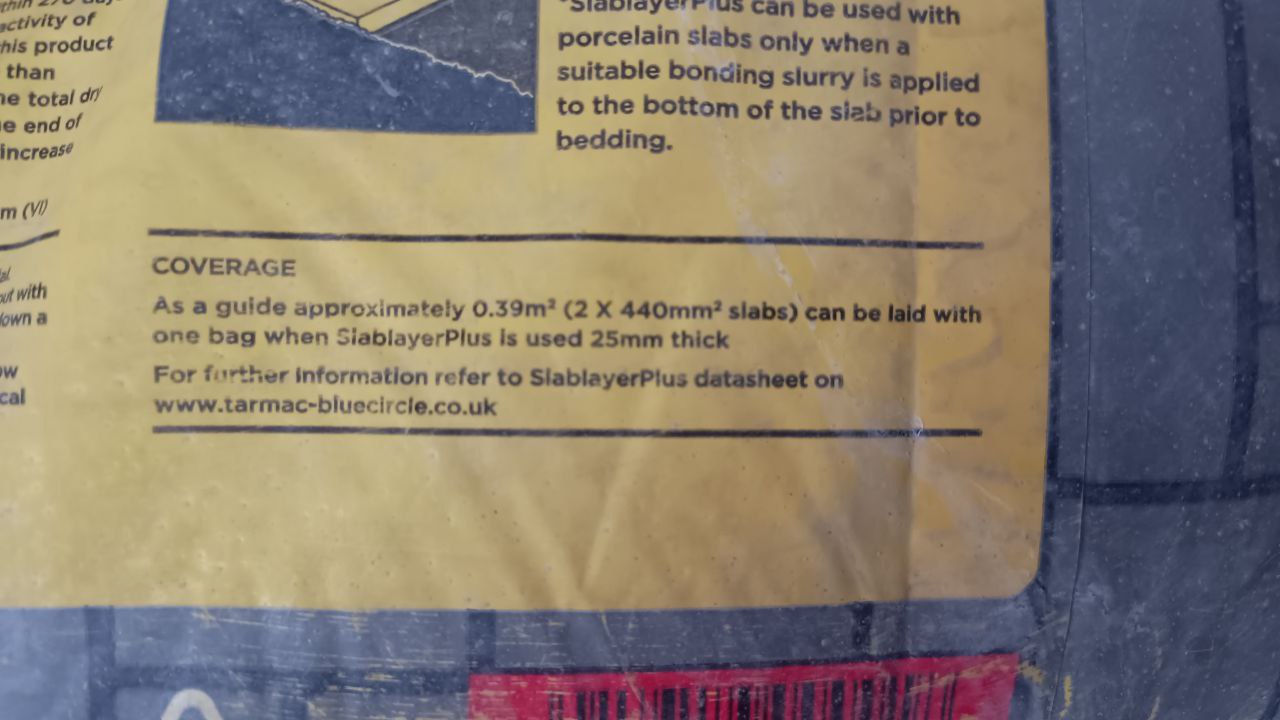
Does this make sense to you? It doesn’t to me. Let’s run through the math:
2x440 mm^2 == 880 mm^2 == 0.00088 m^ =/= 0.39 m^2
Will and I spent 1 hr at B&Q trying to make sense of this. We even used calculators online and found that many of them used various inconsistent math logic. We knew we wanted Slablayer Plus, so it only mattered to us that we understood how much coverage it provided. After running through many possible interpretations, we realised that 440mm^2 is meant to denote a single tile with 440mm sides. So 440mm^2 = 440x440mm^2. Is this some sort of shorthand common in the building industry? I don’t know, but I lost a lot of time figuring it out.
So now:
2x440x440 mm^2 == 387200 mm^2 ~= 0.39 m^2
Lesson 5: Mixing your own mortar will cost you half the price of using Tarmac Slablayer
With the math finally figured out, we learned that we needed 30 bags of slab layer (with a 15% contigency) Each bag cost us £8.45 - that’s £253.5. If we made our own mortar with sand and cement, 5:1 mix respectively, the cost would be roughly half that using B&Q prices (using an online mortar calculator like this).
The other benefit of mixing your own mortar is that you can control the consistency of it depending on your tile size and skill level; which brings me on to…
Lesson 6: Mortar consistency matters, especially if you opt for heavy tiles
The more sand that’s in your mortar, the more porous it’ll be and the more coarse it’ll feel. It’s not advised to go above a 6:1 sand/cement mix, but somewhere between 3:1 and 6:1 is workable. The “correct” ratio is subjective and depends on the size of your tiles and skill. You’ll know if your balance is off based on how easy it was to lay your tiles and whether you can gently toss up and catch a balled up scoop of the stuff in your hands without it falling apart after first “bounce” - that’s it.
Lesson 7: It’s very hard to know WHAT consistency of mortar you need when mixing your own
Not much to say on this other than we had a hard time finding what the right consistency should be (which is that needs to be able to hold its form after a ball of it can be tossed up and caught in your hand once). I only incidentally found this out after scouring through many YouTube tutorials.
Lesson 8: Prepare to spend 15-40 mins laying one tile
If you’re inexperienced, your tiles are large and your mortar consistency is on the dry side (think “sandy”), you’ll have many attempts of laying a tile, checking its level, lifting it and adding/removing mortar. If you have small times and your mortar consistency is on the wet side (think “whipped cream” consistency), your tile laying duration may be on the shorter side.
Lesson 9: Your hardcore really does not have to be that level
We spent a while checking the levels of our hardcore during compaction. I got nervous about a few loose rocks on the surface layer not being properly embedded into the hardcore. As long as the only “undulations” you have are due to a few (1 rock deep) loose rocks, this is nothing to worry about. Your hardcore is going to get trodden to death and screwed about as you lug heavy ass tiles back and forth on it. We knocked a rock or two in our journey and we’re very fortunate that the leveling of the patio is the least of our problems.
Lesson 10: Clean the grout off your tiles before it dries
I’d like to introduce you to our biggest mistake. So far, here’s what our estimated duration was for each activity and its actual duration:
- Laying/levelling hardcore
- Estimated: 1 week
- Actual: 1 week
- Laying tiles
- Estimated: 1 day
- Actual: 3 days
- Grouting (including clean up)
- Estimated: 30 mins
- Actual: 1 month
That’s not a typo. Yes. Grouting and cleaning up the grout took us 1 month (and still counting actually). To be clear, laying the grout took 15 mins. Cleaning the grout took the rest of the time.
Out of impatience, we bought Pavetuf from our local Jewson instead of Nexuse Projoint, since it meant waiting for it to be delivered.
I watched YouTube videos for Projoin, and other types of grouting product, and thought: “ppssshh, sooooooo easy!! I’ll just buy whatever’s off the shelf and use the same application technique.”
Some observations: Pavetuf is a gooey substance, Projoint is broomable. Pavetuf requires a minimum 3mm of depth, Projoint requires a minimum of 20mm.
We blend our Pavetuf and haphazardly scoop it into the joints with spongey material, but it’s really gooey and it’s getting all over the tiles/our clothes and our backs are hurting from kneeling.
This is taking too long, we think. Let’s try this with a floor squeegee. Squeegee is fast, but it certainly spreads the stuff much farther across the tiles. It takes us about 15 mins to finish, but by the time we’re done, about 40% of the tiles are covered in grout. Well, should be easy to wipe off when it’s dry, right?
WRONG. WRONG. WRONG. WRONG.
Remember when I said Pavetuf only needs 3mm of depth to set? The layers were thicker than that and they stuck like a motherfucker. No amount of powerwashing got it off I tell you, I recommend Pavetuf if you DO NOT WANT IT TO COME OFF. Just be diligent in your clean up! Even better, try a grouting bag for applying the grout with minimal clean up!
We’re lucky that Brazilian black slate is durable, because we’ve used a total of 7 bottles of residue removers (concentrated) about 20 sheets of sanding paper (for use with orbital sanders) and we’re down to about 5% coverage now without (visible?) damage to the tiles.
Wish us luck! :')